Vertex Weight Tool
If you bind a skeleton to a mesh via the skeleton tag Cheetah3D automatically generates vertex weights for all joints. But these vertex weights are often not perfect and require some manual adjustments.
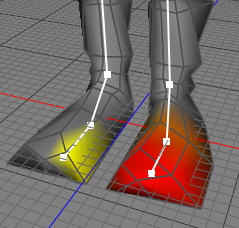
For example in the image below Cheetah3D assigned the toe joint in the left foot also some vertices in the right foot. If you now animate the left foot also the vertices in the right foot will move which isn't desired. It's now the job of the vertex weight tool to fix these wrongly assigned weights.
Modes
This tool works in all modes equally.


To use the vertex weight tool just select "Tools CharacterVertex Weight" from the menu. The vertex weight tool will now show up in the tool properties. To modify the vertex weight of a certain joint you have to select that joint in the joint table of the skeleton tag. Once the appropriate joint is selected, areas with weight 1 will appear in a bright red while areas with a lower weight will fade to yellow. Vertices with zero weight appear grey. To adjust the weights just paint with the mouse in the 3D view.
Keys
- none
Properties
- Size: The size of the brush in screen space.
- intensity: The intensity of the brush.
- Mode:
- Subtract: Decreases vertex weights.
- Add: Increases vertex weights.
- Brush: Shape of the brush. You can choose between a constant of a bell shaped brush.
- Only visible: If checked on only visible vertices will be adjusted. Check this property of if you also want to adjust the vertices on the back of the model which are invisible.
- Auto-normalize: After every brush stoke the vertex weights of the skeleton tag will be auto-normalized. That ensures that the sum of weights of each vertex is 1.